![[screenshot]](main.png)
| Prev: 4. Graphical Interface | [ home ] | Next: 4.2. Playlist |
You can control most of the program from this window. The cue controls in the bottom-left corner are fairly obvious. You can drag the large slider in the middle for seeking. There are two smaller sliders above that, the left one is for adjusting the volume and the right one for adjusting the balance. Above these, there are two horizontal text areas showing information about the currently playing track, and input/output parameters such as sample rate, mono/stereo, bitrate, output driver (e.g. OSS, ALSA, JACK) etc. The first trick to learn is that these lines are horizontally draggable with the mouse if the text does not fit in the available visible space. However, they don't scroll automatically, and for a very good reason.
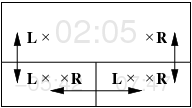
In the upper left corner, you find one bigger and two smaller displays that show track times: elapsed time, remaining time and total track time. The big display also shows the current volume and balance setting when appropriate. By clicking in these displays, you can rearrange the displays as you want them. The following figure shows how the displays switch their contents after clicking into them with the left (L) or right (R) mouse button.
In the bottom right corner there are additional buttons. The buttons with the letters display or hide additional windows of the program:
| FX | Ladspa Patch Builder |
| MS | Music Store |
| PL | Playlist |
Note that depending on the skin, these buttons may come with images instead of the letters above. However, their functionality does not change.
The remaining three buttons are to select the playback mode. When none of these buttons is depressed, playback goes the normal way. The buttons are mutually exclusive, and select track repeat, list repeat or shuffle mode. I'm sure you can figure out which is which. If you select track repeat, a loop bar appears above the seek bar, with two markers. The markers can be dragged to select the looping range. When they are at the left and right end positions, the whole song is repeated. The looping range can also be selected using keyboard shortcuts. When track repeat is enabled and the current song is playing (or paused), `<' will set the start of the looping range to the current playing position; `>' does the same for the end of the looping range.
Volume and balance slider tricks:
An additional thing to know about the volume control is that it ranges up to +6 dB. This means you can send a bigger signal to the audio device than in the original file. With 0 dB corresponding to 100% signal level, +6 dB is almost exactly 200% signal level (and 4 times signal power as well). This means you can overdrive your output device, and since clipping will occur at 100% anyway, it will cause nasty digital distortion much worse than simple analog overdrive. If you have a track with a reasonably low level, you can go above 0 dB with the volume control. But today most CDs are mastered to keep the average volume level very close to the 0 dB (or 100%) top, and so they will likely distort with as little as +1 dB additional gain. The moral is: if you want it loud, turn up your external amp. You can also consider using RVA if the volume level of your tracks tends to vary in a wide range – see this section for details.
On a related note, another thing to watch out for is LADSPA plugins (in case you use them). It is very common that the signal level leaving a plugin is greater than the signal level the plugin gets on its input. So it is best to leave a few dB of headroom if you do that. A very typical case is boosting some frequency bands a few dB with an EQ plugin. You should decrease the overall volume level with as much dB as the largest boost (or even more), or you are risking that the signal will get chopped causing bad distortion. Alternatively, apply this limiter plugin as the last one in the processing chain, but only if you know what you are doing.
Right-clicking almost anywhere in the window will bring up a menu that allows access to the Settings dialog, the Skin Chooser, the JACK Port Setup dialog (present only when running the program with JACK output), and the About box. The latter may be useful to see which features have been compiled into the program. (If you haven't read the page about compiling yet: the configuration of the program can be adapted so as not to require certain libraries when compiling, and not provide certain features accordingly.)
| Prev: 4. Graphical Interface | [ home ] | Next: 4.2. Playlist |